

DESCRIPTION
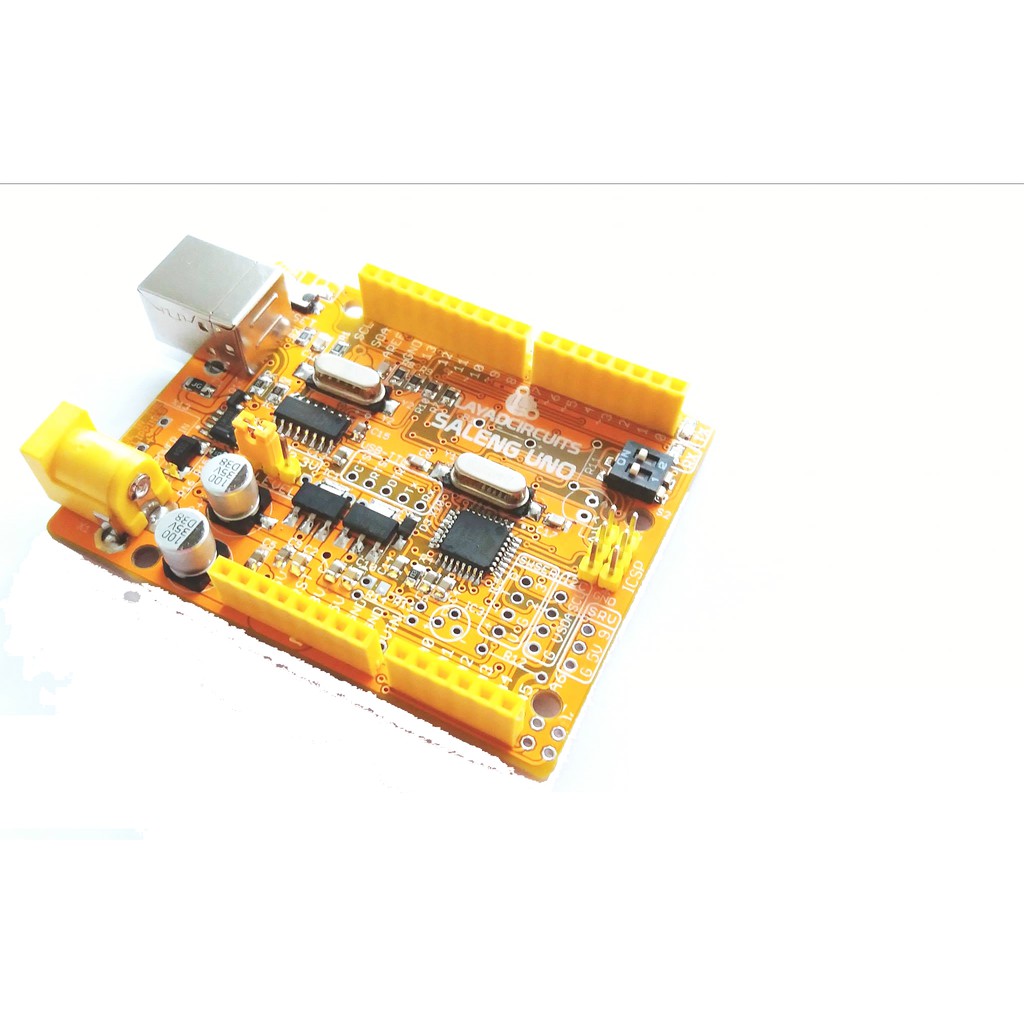
The Saleng – Uno microcontroller board is an Arduino
compatible board based on the 8-bit ATmega328P
microcontroller. The microcontroller has a RISC
architecture and runs at the maximum clock speed of
16MHz. It has 32KB of flash memory for code space and
2KB SRAM with an additional 1KB of general purpose
EEPROM. There are a total of 20 GPIO’s on board with
an additional 2 analog inputs, all broken out into
standard 2.54mm-pitched pin headers.
Its design is nearly identical to the Arduino Uno R3 but
with several enhancements. It is compatible with the
Arduino Software / IDE and should work with almost
any application, hardware or program/sketch meant for
the Arduino Uno. This means all the standard features
of the Arduino Uno are implemented on the Saleng
Uno, only that the Saleng Uno offers more features.
The Saleng Uno board is part of Layad Circuits’ Saleng
series of innovation-starter products.
SPECIFICATIONS
Microcontroller : ATmega328
Operating Voltage: 5V or 3.3V (Jumper
Selectable)
Input Voltage (recommended): 7-9V
Input Voltage: 6-12V
Digital I/O Pins 14 (of which 6 provide PWM
output)
Analog Input Pins: 6 (A0-A5) + 2(A6,A7)
DC Current per I/O Pin: 40 mA
DC Current for 3.3V Pin: 800mA
Flash Memory 32 KB (ATmega328) of which
0.5 KB is used by bootloader
SRAM: 2 KB
EEPROM: 1 KB
Clock Speed: 16 MHz
Programming Interface: USB
Board Dimensions: 55 x 70mm
SERIAL PORT DRIVER
The Saleng Uno uses the popular CH340G chip as its
USB-UART interface controller. Saleng Uno users will
need to do a one-time installation of the driver for the
computer to recognize the Saleng Uno as a serial port.
To install, follow these steps:
1) Download the driver installation files from the
following links:
Windows Users: http://www.wch.cn/downfile/5
Mac OS Users: http://www.wch.cn/downfile/178
2) Uncompress the downloaded file
3) Go to the CH341SER folder
4) Run setup.exe
5) On the window that pops up, click on the Install
button
6) Wait until installation is complete. Note that if you
previously installed the driver, the installation may

report a “failed” installation. If there is a need to
reinstall, please uninstall first then reinstall.
7) Reboot the computer
8) After reboot, insert the Saleng Uno into one of the
USB ports of the computer. The computer should now
recognize the board.
SOFTWARE DEVELOPMENT
As the Saleng Uno conforms to all the requirements of
the Arduino IDE and Arduino Web Editor. It is thus
programmed in the same way as any other Arduino
board. Download and then install the official Arduino
IDE release from:
https://www.arduino.cc/en/Main/Software
PROGRAMMING LANGUAGE
Arduino programs or “Sketches” are written in C/C++
programming language with some modifications made
specifically for the Arduino hardware. The official
Arduino website provides a set of guides and references
you may want to start with:
Guide to the Arduino IDE:
https://www.arduino.cc/en/Guide/Environment
Arduino “Language” quick reference:
https://www.arduino.cc/reference/en/
A beginners reference “notebook”
https://playground.arduino.cc/uploads/Main/arduino_n
otebook_v1-1.pdf
SALENG UNO ENHANCEMENTS
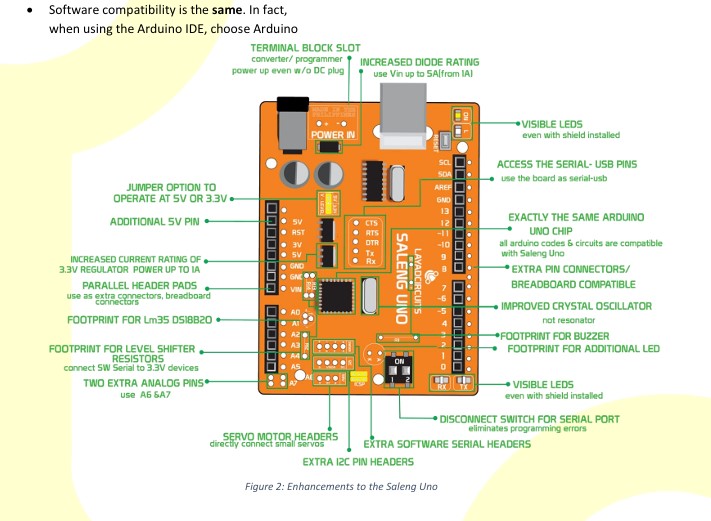
While the Saleng Uno has exactly the same
microcontroller as the Arduino Uno, there are
significant enhancements made on the Saleng Uno:
- 3.3V pin can output up to about 800mA
compared to the 50mA of the Arduino. This
provides added current allowing certain 3.3V
circuits requiring more than 50mA (such as the
ESP8266) to be directly powered off the Saleng
Uno without additional regulators. - Operating Voltage may be switched between
3.3V and 5V. It may be practical in some cases
when there are several 3.3V devices involved to
simply use a 3.3V MCU. This can be done in the
Saleng Uno by switching the V-LEVEL jumper to
3.3V side. This provides 3.3V in all digital and
analog pins and the 5V pin of the Saleng Uno
effectively outputs 5V. Switch V-LEVEL jumper
to 5V to return to the default 5V operation. - Additional headers & Breadboard friendly.
Each of the 4 pin headers at the sides of the
board have parallel pads for extra connections.
You may install male or female headers, at the
top or bottom side. The additional headers pads
on the Saleng Uno from pins 0 to 13 to SCL are
equally spaced at one pin distance (2.56mm)
avoiding problems caused by the half-pin-space
between pin 7 and 8 of the main headers. This
results in a breadboard friendly board and
easier connection to matrix PCB’s or custom
shields. - Available Terminal Block slot as Power
Connector. Aside from the standard DC jack
already installed on the board, the user may
install a 5mm terminal block or pin headers on
the slot labeled X13 to facilitate connection by
simple wire without need for a DC barrel plug.
This port is in parallel with the DC jack. - One extra 5V pin at the power header. An
additional 5V pin is provided beside the 3.3V
pin. There are also other extra 5V pads. Install
female or male 2.54mm headers and you may
get additional 5V and GND pins. - Clock source uses a crystal. Instead of ceramic
resonator, the Saleng Uno board uses the

higher accuracy crystal oscillators for the best
timing performance.
- Uses a 5A Schottky Diode instead of 1A. The
Schottky diode between the DC Jack and VIN
pin is normally rated at 1A in other board, the
Saleng Uno uses 5A! The extra tolerance means
it is useful when using the VIN pin to power
other devices such as shields and other external
circuits, even a 2A GSM shield/module will not
be a problem if its power is taken from the VIN
pin. - USB interface uses the widely used CH340G as
a dedicated USB-to-Serial converter chip. After
Extensive evaluation of this chip, we found no
significant performance difference against other
more expensive solutions. This helped to keep
the price of the Saleng Uno to a minimum. - Pins 0 and 1 may be temporarily disconnected
from the ATmega328P using the onboard
switch. This is useful to prevent upload
problems/conflicts when some circuit or device
is connected to pin 0 and/or 1. Simply switch it
off before uploading code and then turn it back
on after uploading. - LED’s have been moved to the board edges for
better visibility. In cases where a shield or
other hardware obstructs view of the center of
the board, the LEDs will still be visible from the
side as they have been moved to the board
boundaries. - The bottom side of the headers are labeled.
Unlike regular boards, the Saleng Uno has its
pins properly labeled on both top and bottom
allowing visibility even when a shield is
installed. - Slot for Temperature IC. A regular TO-92
temperature IC such as the LM35/LM36 or
DS18B20 may be installed in the slot labeled
IC3. The datapin connects to A0 of the Saleng
Uno. If a pullup resistor is required such as in
the case of the DS18B20, install the resistor at
R12 (4.7K for a DS18B20 chip)
- Slot for additional builtin LED. When the builtin
LED wired to pin 13 is not enough, a second LED
may be installed at the footprint labeled L2. A
standard 5mm or 3mm LED may be installed
while. Choose a resistor between 330 and 1K
ohm and install in R11 to serve as current
limiting resistor. - A servo motor port at header SRV. This header
provides a quick connector for a small servo
motor such as an SG90 or MG90. The signal line
connects to pin 9 of the Saleng Uno. - Extra I2C header. While the Saleng Uno follows
the R3 design with extra I2C ports after the
AREF pin, it also has an extra header in parallel
with the I2C port of the ATmega328P. Use the
header labeled I2C to quickly connect I2C
devices such as I2C controllers for LCD’s, RTC’s
like DS1307 or DS3231 or perhaps ADXL345. - A Software serial port header compatible with
3.3V serial devices. The header labeled SWSER
allows the user to connect a 3.3V serial device
such as HC-05/HM-10, SIM900/SIM800 or
ESP8266 be safely interfaced to a software
serial port programmed at pins 2 (Rx of Saleng
Uno) and 3 (Tx of Saleng Uno). - Slot for a 12mm buzzer. The saleng UNO can
accommodate a 12mm buzzer in the pads
labeled B1. This is directly driven by pin 6 of the
Saleng Uno. Select a 5V buzzer with peak
current that does not exceed 40mA as this slot
is directly connected to the microcontroller
GPIO and is without a series resistor. Common
5V Active, ~12mm buzzer usually work fine.
Summary of Comparison between Saleng Uno vs
Arduino Uno:
All specifications pertaining to the
microcontroller are exactly the same because
both use the same chip.
Bootloader is the same

Uno under Tools>Boards to program the Saleng
Uno.
All power specifications are the same except for
the better maximum current that the 3.3V
regulator can offer in the Saleng Uno board
The Saleng Uno introduces several
improvements as listed under the Enhancement
section of this document.
The Saleng Uno is locally designed and
assembled in the Philippines.